Maintain your own Homebrew repository, with binary bottles
I’ve been using the Homebrew package manager for nearly a decade. After a few years of contributions I was asked to become a maintainer and was recently elected to serve on the Homebrew project leadership committee. Homebrew is an excellent cross-platform package manager, supporting macOS, Linux, and Windows 10.
That being said, Homebrew does not package everything. Many things are too niche, specialized, or complicated for the Homebrew maintainers to build and distribute. Homebrew has over a million installs, yet has a small team of only about 20 volunteer maintainers who deal with this huge responsibility. Homebrew relies extremely heavily on its community to report and fix bugs that crop up in the packages that they use, since maintainers can’t be expected to rigorously check the correctness of 4,000+ packages.
Getting started with taps
Suppose that your software doesn’t fit the requirements for the main Homebrew repository, but you’d still like to distribute it somehow. Homebrew’s built-in packages can be extended using third-party repositories, called taps. Taps are just a GitHub repository with names that start with homebrew-* that contain some Homebrew formula files. Homebrew has a built-in command to get you up and running immediately, brew tap-new.
$ brew tap-new jonchang/biology
$ cd $(brew --repo jonchang/biology)
$ pwd
/usr/local/Homebrew/Library/Taps/jonchang/homebrew-biology
Now I can create a new formula for this tap with brew create --tap=jonchang/biology <URL> and edit it in the usual manner. For help with this step, see the Formula Cookbook.
If your software requires compilation, however, one problem is that your users will need to build your software from source. This might be fine if the build process is straightforward, but if not, you might find yourself spending a lot of time debugging obscure compiler failures for your users.
Bottling formulae for your tap
Homebrew can distribute precompiled binaries of your software, called bottles. By default, everything in the main Homebrew repository (Homebrew/homebrew-core) is bottled. This provides a superior user experience and saves time when installing software that takes a long time to compile (e.g., GCC).
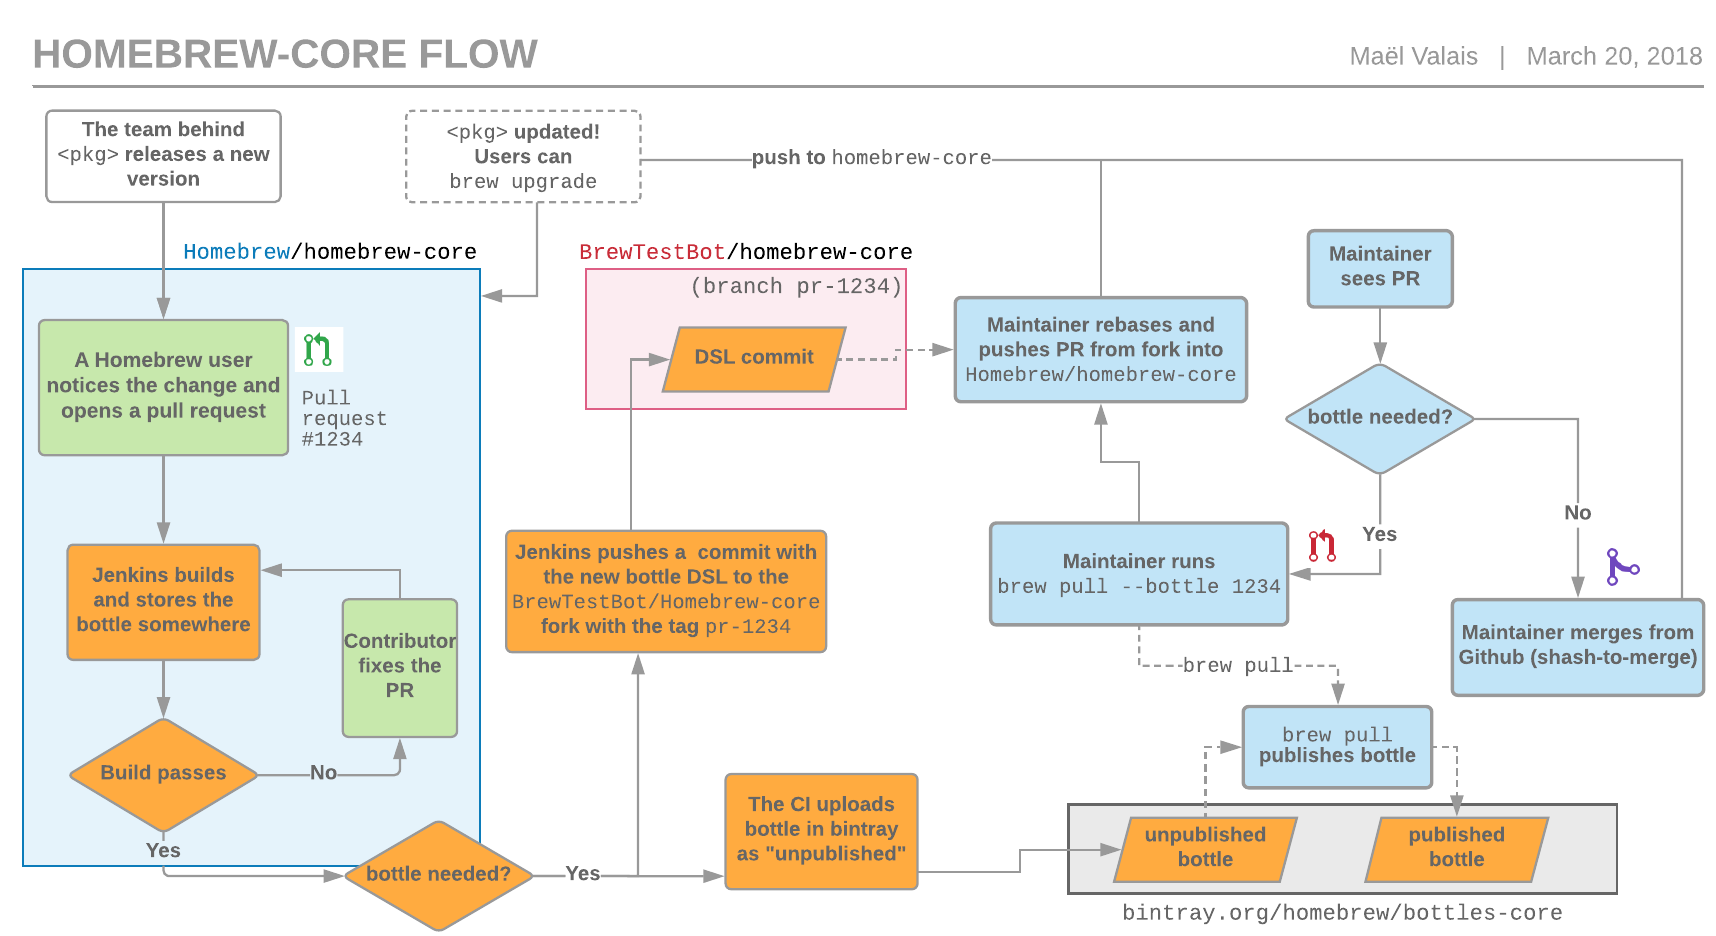
However, this process can be quite complicated and involved. This GitHub Gist and the flowchart below (by @maelvls) gives an excellent overview of the Homebrew/homebrew-core process, including its internal Jenkins installation and the pull request workflow for maintainers. While it is possible to set something up like this using Travis by following the linked Gist, for a tap where you are bottling only a few formula for software that are infrequently updated, I think it is overkill since you can easily spend far too much time figuring out why Travis has broken yet again.
Here, I lay out instructions on how to compile binary bottles on your own machine, using a Docker Linux build, as well as a virtualized macOS installation.
Bintray setup
Sign up for an Open Source Bintray account. Homebrew uses Bintray to distribute its own binaries, and accounts are free for open source software.
Next, set up the Bintray repository where your bottles will be uploaded. This should be named like https://bintray.com/USER/bottles-TAP. You may also want to set a default license for your Bintray repository, since the Bintray OSS plan requires that all packages you distribute via their service to also be open source software.
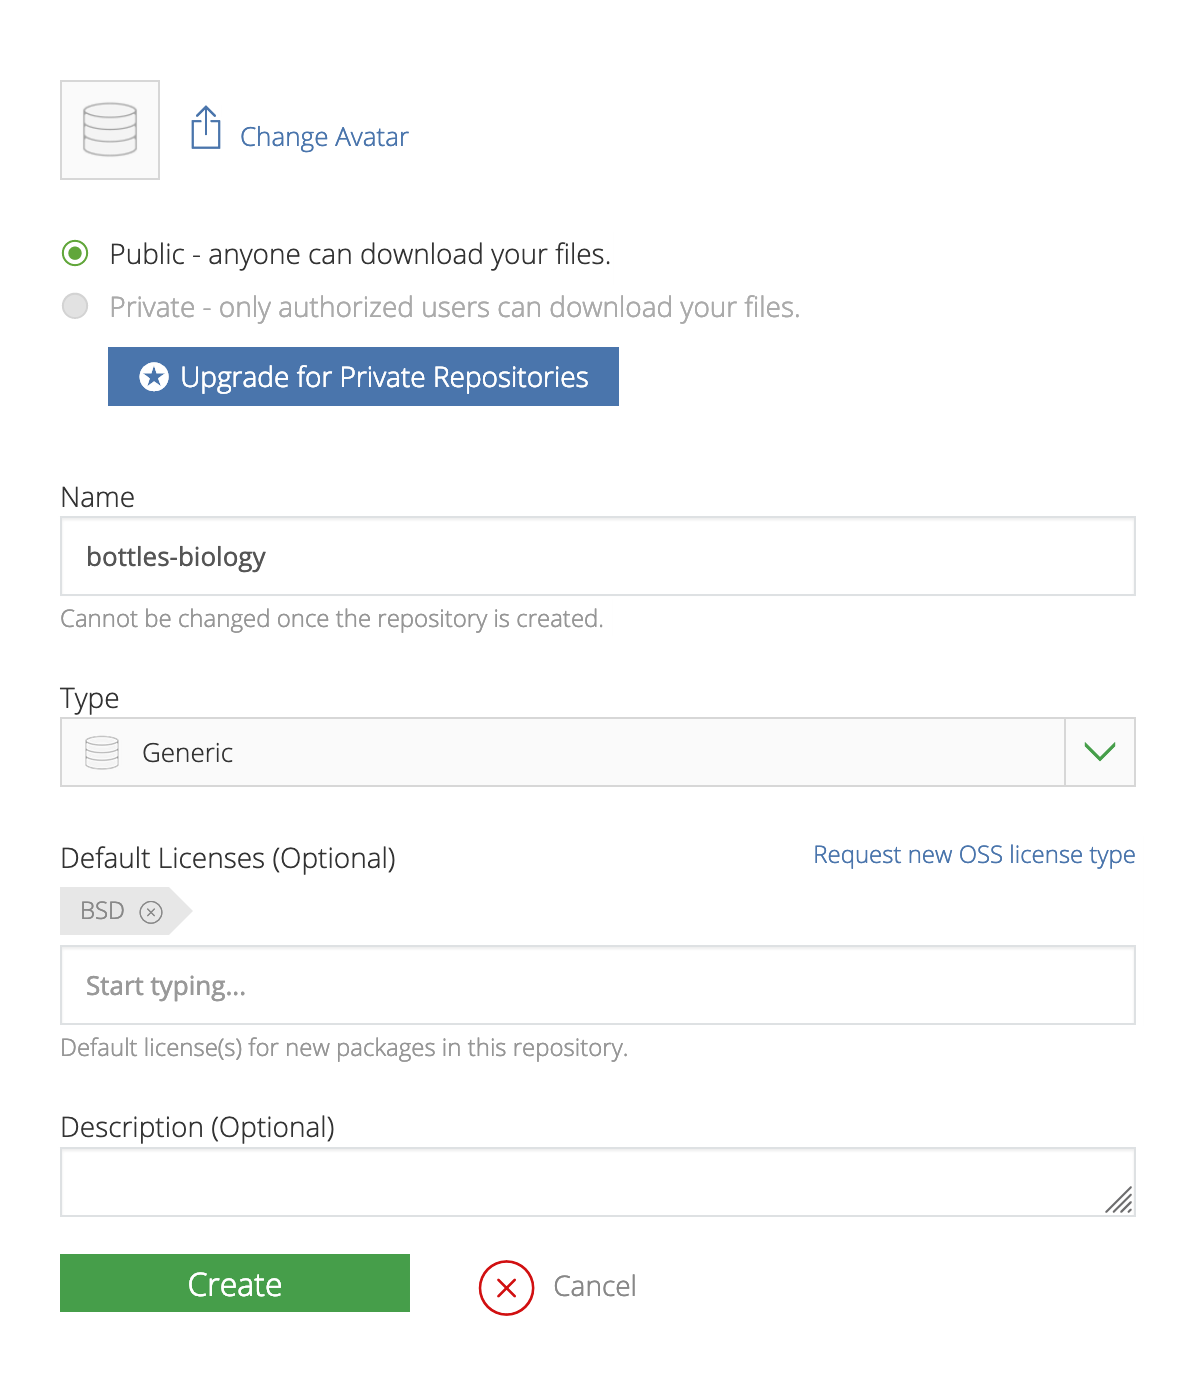
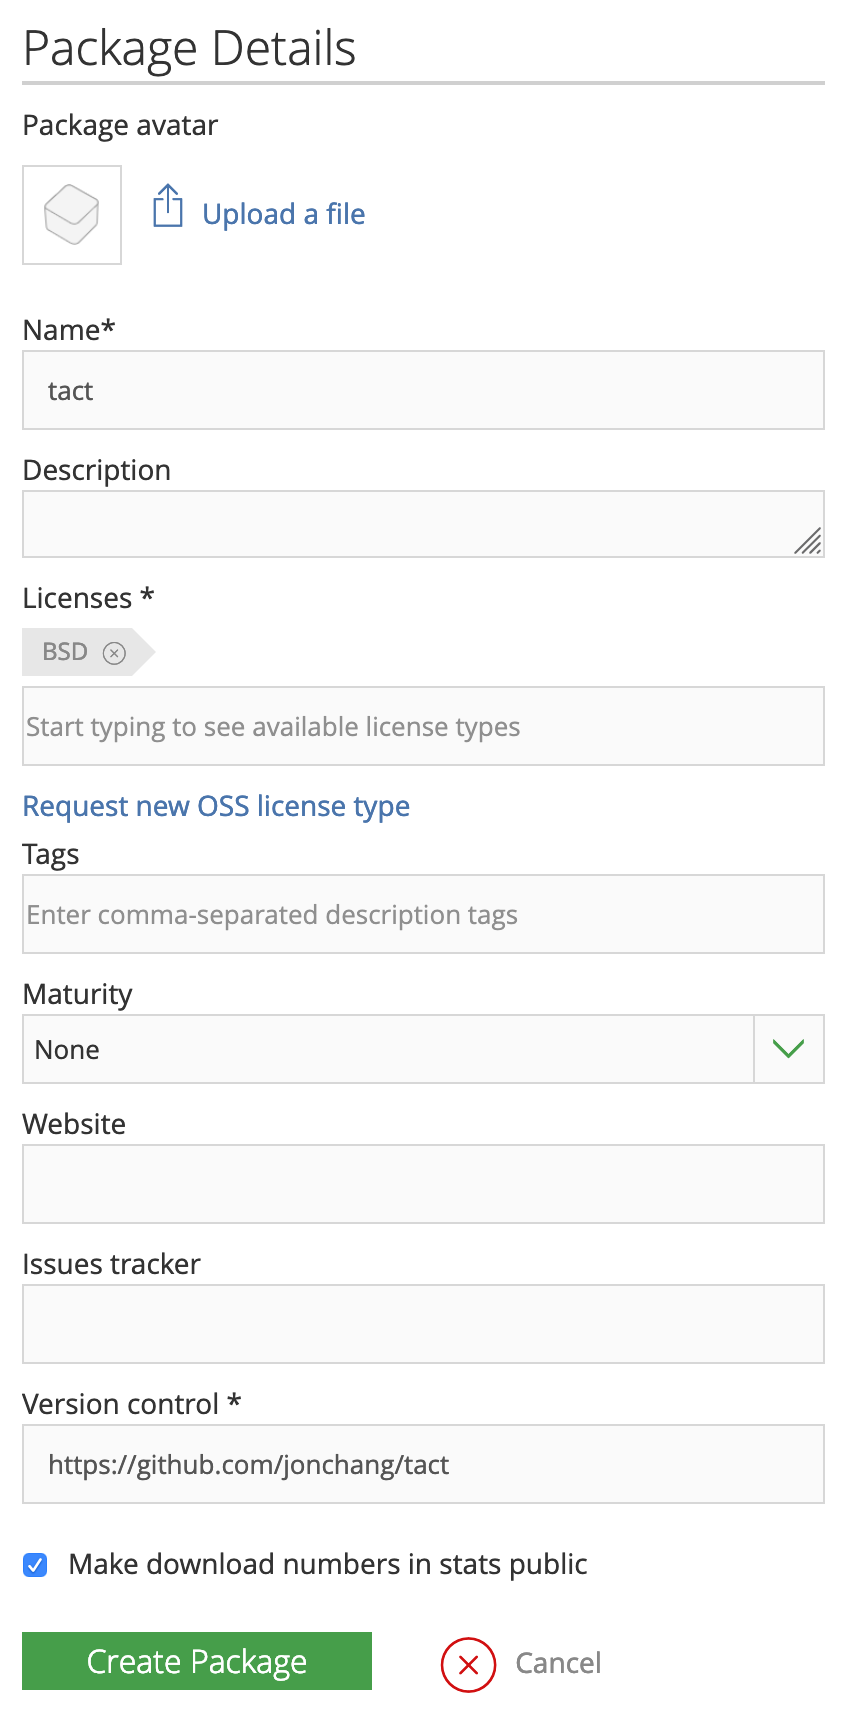
If you didn’t specify a default open source license, you’ll also want to Add New Package in your new repository and set the license field appropriately. The name of the package should match the name of the formula you’re building a bottle for.
Linux setup
Install Docker (brew cask install docker) and ensure the Docker service is running by opening Docker.app and checking the Docker icon in the menu bar. Then, run the following commands to download the Docker image for Homebrew on Linux, and enter an interactive shell within that Docker container:
docker pull homebrew/brew
docker run -it --name=brew homebrew/brew
Even if you’re following this guide on Linux, I still recommend using the Docker image, as this ensures that the build system for the software you’re packaging will not link against something you’ve already installed on your machine. As Homebrew on Linux does not yet support sandboxed builds, it’s possible that opportunistic linking during the packaging process will cause problems for your users. Homebrew attempts to detect and warn for this, but using the Docker image is still safer.
macOS Setup
By default, the main Homebrew repository builds binary bottles for the last three macOS versions. Building bottles for all three systems is a lot of work, but you can mitigate this by building a single bottle for the oldest version of macOS that you intend to support, and Homebrew will attempt to use that bottle for newer macOS versions. This is not always guaranteed to work correctly, and you should do a few tests to ensure your software still runs, but it should reduce how many separate bottles you need to build.
I’ll use macOS Sierra here, since that’s the oldest macOS that Homebrew supports at the time of this writing. You can run an older version of macOS, but note that the Homebrew does not support OS X Mountain Lion (10.8) or older, so building bottles for very old systems is not possible.
I used this guide to set up a Sierra VM up with VirtualBox (brew cask install virtualbox). You must be running Apple hardware in order to legally virtualize macOS (macOS 10.14 EULA, §2B(iii)). Once macOS is set up, install Homebrew per the usual instructions.
If you’re already running macOS with a working Homebrew installation, you can also just build a bottle on your own system by following the same instructions.
Bottling for a single system
We’ll be using the Homebrew Test Bot for these commands. This is the same script that Homebrew uses for its own continuous integration infrastructure. You’ll need to specify a few arguments:
--root-url will point to your Bintray repository URL. This will usually start with dl.bintray.com; for example, mine is https://dl.bintray.com/jonchang/bottles-biology.
--bintray-org is your Bintray organization name; in this case, your Github name.
--tap is the short form of your repository; that is, if your repository is located at https://github.com/jonchang/homebrew-biology, the tap is jonchang/biology.
The last argument will be the formula that you are building bottles for. You can specify multiple formulae here, but you should ensure that the fully-qualified name of your formula is used.
To speed things up, you can also pass --skip-setup option to bypass some build environment tests.
brew test-bot --root-url=BINTRAY_ROOT --bintray-org=BINTRAY_USER --tap=USER/REPO USER/REPO/FORMULA
The test-bot command will create several files related to the formula you are building: a .bottle.tar.gz bottle and a .json metadata file, named as FORMULA--VERSION.OS.
Bottling for multiple systems
If you are bottling for multiple systems (e.g., multiple versions of macOS, or macOS and Linux), first follow the single system steps for each system you’re packaging for. Then, copy over all .json files and .bottle.tar.gz files to a folder on a single machine. This should be a new folder created for this specific purpose and should only have the JSON and bottle tarballs.
To copy from Docker, run:
docker cp brew:/home/linuxbrew/. .
To copy from VirtualBox, run:
scp -P2222 user@localhost:*.{json,tar.gz} .
You’ll want to check with ls that all of the files have the same name, save for the extension and the OS. One common problem here is that bottles will have different rebuild numbers. For example, a file might be named formula--0.1.sierra.bottle.1.tar.gz, implying that it is on rebuild 1, while another might be named formula--0.1.mojave.bottle.tar.gz, implying that it is on rebuild 0. You can fix this by renaming the file, and editing the JSON file to correct the rebuild field.
Uploading the bottles
Once you’re satified everything is correct, it’s time to upload your bottles to Bintray. You’ll need to specify your Bintray username and access token by setting the HOMEBREW_BINTRAY_USER and HOMEBREW_BINTRAY_KEY environment variables. Your key can be found by clicking Edit Profile -> API Key when you are logged in to Bintray. Then, in the folder where your bottles and JSON files are, run:
brew pr-upload --bintray-org=BINTRAY_USER --root-url=BINTRAY_ROOT
If you don’t want to publish the bottles right away, you can additionally pass --no-publish to brew pr-upload and Bintray will upload the files but keep them private. Once you’ve checked the bottles, you can go to your package on the Bintray website and hit “Publish”.

Now, from your tap repository, run git log -u to ensure that the bottle do block looks correct, then git push so your users will see the new bottles. Finally, brew install FORMULA to check that your bottle is getting downloaded and installed properly.
Cleaning up
- Remove the temporary folder where you stored bottles
-
docker rm brewif you used Docker -
VBoxManage controlvm 'macOS Sierra' savestateif you used VirtualBox
Updates
You’ll need to update your bottles in a few situations. If you release a new version of your software, update the url and sha256 in your formula and, if needed, the version field. See brew bump-formula-pr for a quick way to do this. When a library your formula depends_on has breaking changes (e.g., Boost), you’ll need to increment the revision number; if this isn’t already present in your formula, just add revision 1. You can remove this when your software gets a new version.
In both cases, you’ll also want to remove the bottle do block (since your old bottles are now invalid), then git commit and git push your changes. At this point you can build new bottles as above.
Future work
There’s some work planned to get brew test-bot to support more third-party repositories with GitHub Actions, but this will take some time to get off the ground. Hopefully, this bottling experience will be much better in the future, but for now I think this is the solution that trades off ease of setup and ease of use.
There’s a lot you can automate here; I recommend also writing down an “update playbook” that you place in the README of your tap so you don’t forget these steps when releasing new versions of your software. This blog post is, in fact, the guide for my personal workflow. Happy bottling! 🍺