Deploy your website to Neocities using GitHub Actions
- General guidelines for automation
- A simple example
- Adding your Neocities API token
- A fallback deploy option
This personal website (and a few of my hobby websites) are hosted on Neocities, a free web host service reminiscent of the now-defunct GeoCities. Neocities makes it incredibly easy to start creating websites right away, even for total beginners, with their web interface.
However, I prefer to have all of my websites version controlled with Git and hosted on GitHub. To minimize the amount of thinking I need to do when I want to publish something new, my ideal workflow is something like this:
- Edit website
git commit && git push- Changes go live
How do I accomplish this? By automating step 3 using GitHub Actions.
General guidelines for automation
You often don’t need to dive straight into the deep end of automating “all the things” right away. It’s better to build it up over time, through a gradual process that might look something like this:
- Type commands into a terminal window
- Copy and paste from a playbook checked into version control
- Move the code into a script that you remind yourself to execute in README.md
- Set up a GitHub Action to run that script on each commit
This kind of staged approach is important since you don’t want to fall into this classic trap:
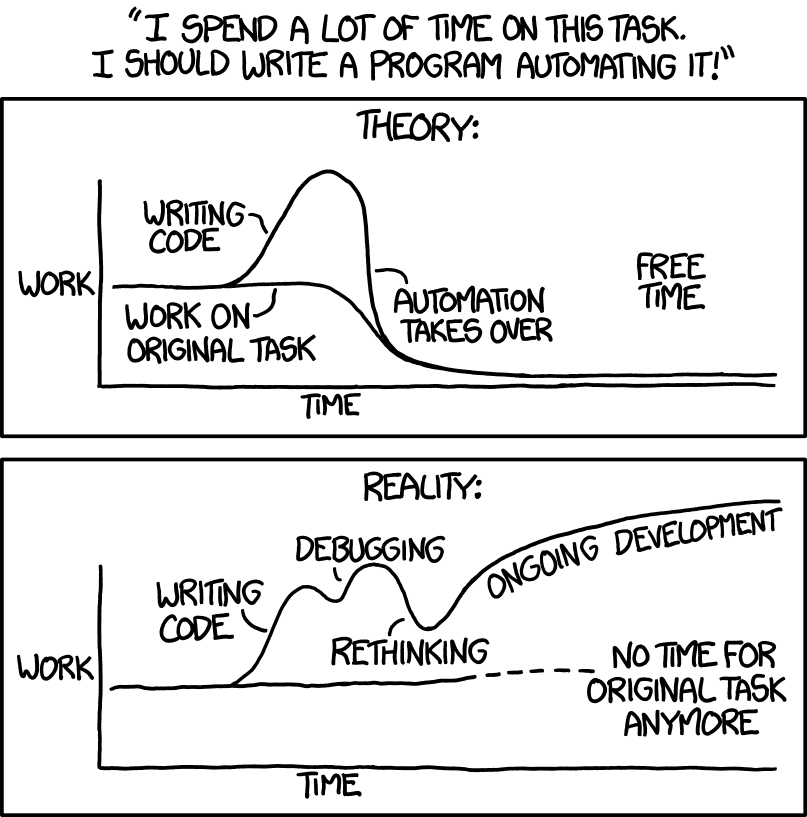
Automation is actually a pretty ideal situation when deploying a website. There should be little in the way of configuration changes or other tweaks necessary once you’ve got everything set up, so the need to debug your code is hopefully minimized after you’ve gotten over that initial hump.
A simple example
Suppose your website has a single HTML file, which is transformed with some terminal commands, the result of which is deployed to Neocities.
In this scenario, your HTML file has some text in it, but you also want to add a “Last updated” line that will automatically update without manual intervention.
index.html.template
This is a basic HTML file, and I’ve included a marker, __LAST_UPDATED__ that will be replaced with the last updated date.
<!doctype html>
<html>
<body>

<h1>Dogs I've met</h1>

<ul>
    <li>Bacon</li>
    <li>Poutine</li>
    <li>Muffin</li>
</ul>

<p>This list was last updated on:
    <em>__LAST_UPDATED__</em>
</p>

</body>
</html>
Makefile
This Makefile uses sed to replace the marker __LAST_UPDATED__ with the current date and time, retrieved from the /bin/date command.
DATE := $(shell /bin/date)
site: index.html.template
	mkdir -p _site
	sed -e "s/__LAST_UPDATED__/$(DATE)/" index.html.template > _site/index.html
Now, you can imagine that the above Makefile could have a deploy target, where you rsync some files to a remote server. But we’ll use GitHub Actions here instead, so that your deploy step will happen after you git push your site up to GitHub.
.gitignore
Since your _site directory is a generated artifact, it’s a good idea to exclude it from version control.
_site
.github/workflows/ci.yml
This is the file that tells GitHub how to run Actions on your repository. It’s longer and more complicated than the other files, so I’ll break it up into different pieces. You can see the fully assembled YAML file at the end of this blog post.
First, we need to name the workflow, and specify which events this workflow should run on (push events to branches, and all pull_request events). Another interesting event is the workflow_dispatch event, which lets you trigger workflows manually. This can be useful when your build script, for example, fetches data from an external resource that updates at a different cadence from your typical git pushes.
name: Build site
on: [push, pull_request]
Define the job that will be run, and what kind of GitHub-hosted worker to run the job on. We’ll use ubuntu-latest in this example. I recommend using this one whenever possible as it starts up the quickest (ideal for rapid iteration), and for private repositories, will cost the least in billable runner minutes.
jobs:
  build:
    runs-on: ubuntu-latest
Each job consists of several steps that are run in order, possibly with conditions and various configuration options. We can reuse parts of workflows that other people have created; in this case, it’s the GitHub-created actions/checkout workflow, which checks out the current Git repository and handles the various permissions and authentication for you.
    steps:
      - uses: actions/checkout@v2
The next step is to run our make command. If there’s no existing workflow that does something for you, it’s easy to define your own by using a run: option.
- run: make
Per the Makefile above, the last step will have created a new folder _site that contains the generated website. Now this will deploy that website to Neocities, using Bret Comnes’s deploy-to-neocities workflow.
- uses: bcomnes/deploy-to-neocities@v1
We’ll need to specify some additional conditions. We don’t want to deploy the website if the previous step failed, so add a success() qualifier, and if we’re not on the main branch (say if we were developing something in a feature branch), we shouldn’t deploy either.
if: ${{ success() && github.ref == 'refs/heads/main' }}
Finally, we need to configure the bcomnes/deploy-to-neocities workflow with a few things, namely our Neocities API token (which we’ll set up later), the folder that we want to deploy to Neocities (dist_dir: _site), and whether we want to delete files that exist on Neocities but don’t exist in our deployment folder (cleanup: true).
        with:
          api_token: ${{ secrets.NEOCITIES_API_KEY }}
          dist_dir: _site
          cleanup: true
Adding your Neocities API token
Once you’ve created your Neocities site (and optionally given them money for a Supporter account), head on over to the Settings page and generate an API token:
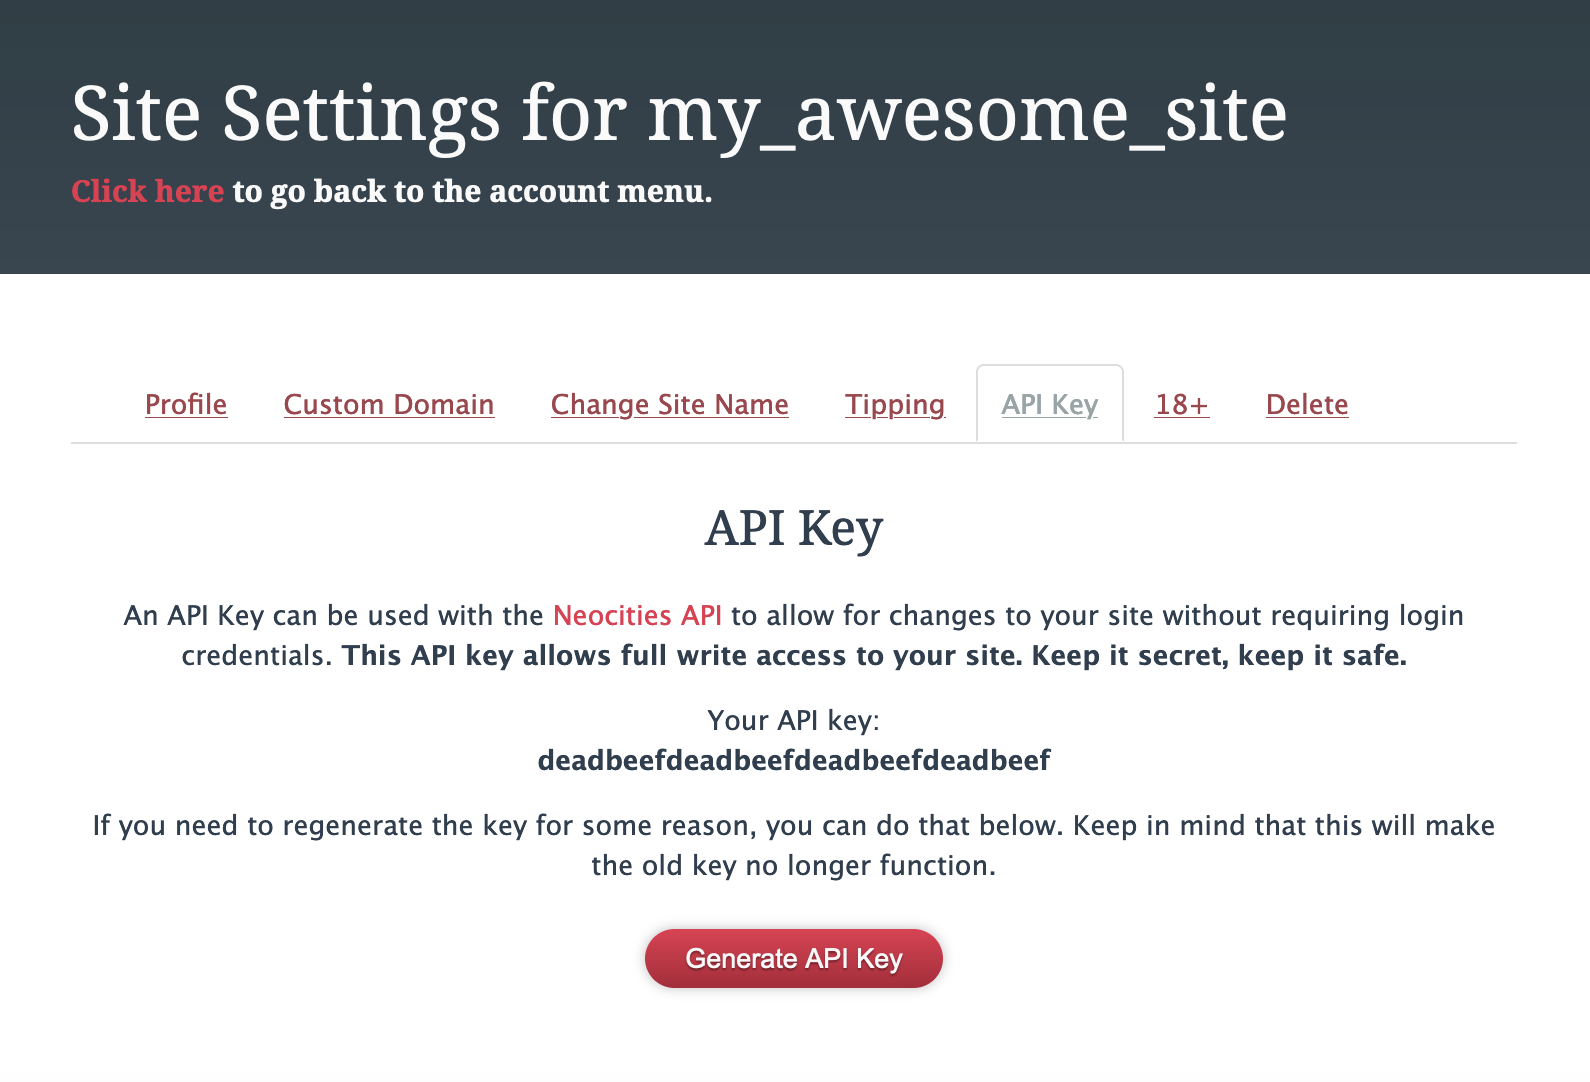
(The screenshot has a fake token, but it should be a 32 character hexadecimal string.)
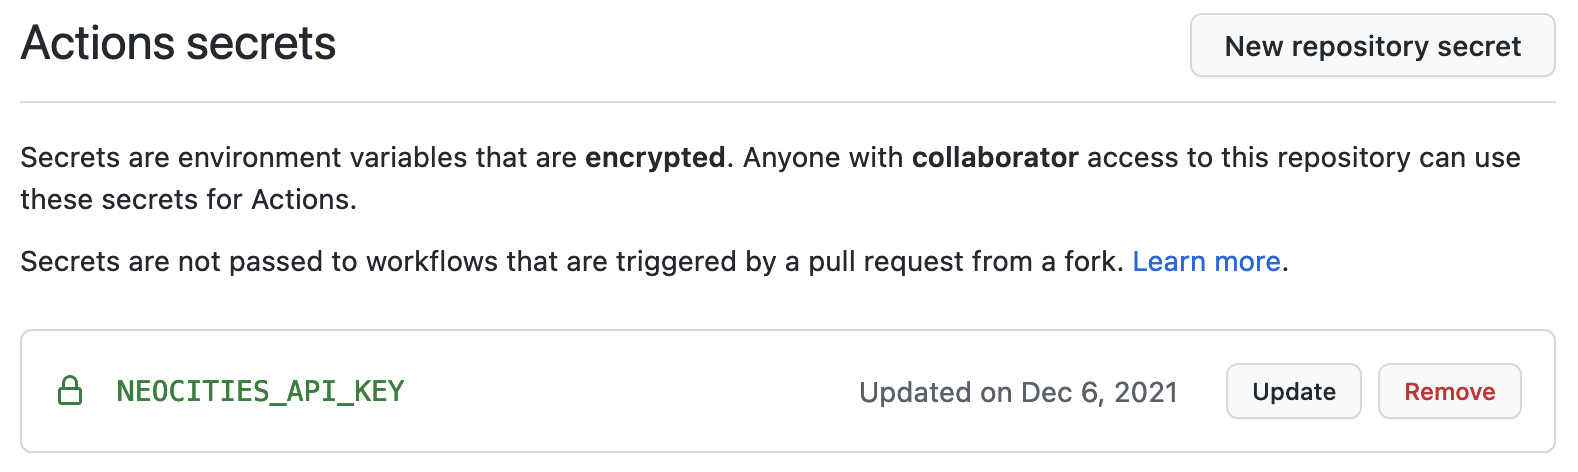
Copy this token and add it as a secret to your GitHub repository, with the name NEOCITIES_API_KEY.
Once you’ve added this token, you’re all set! Just git commit your repository and git push, and assuming everything has been done correctly, you can view your Actions workflow results directly in the GitHub web interface and watch your files get uploaded to Neocites.
A fallback deploy option
One issue that I’ve experienced is sometimes the clever diffing algorithm in the bcomnes/deploy-to-neocities workflow fails to work. I’m not sure whether it’s because of something on the workflows side or something on Neocities’ side, but I wrote my own GitHub Action, jonchang/deploy-neocities to serve as a fallback should the other workflow fail. My version is a bit slower, but it uses the official Neocities Ruby gem, and I haven’t had any problems with it even when the number of changes to make is large.
To set it up, first tweak the earlier workflow step to add a few new fields. In particular, the id: field lets you refer back to this workflow step, and continue-on-error: means the workflow can keep on running even if this particular step encounters a problem.
      - if: ${{ success() && github.ref == 'refs/heads/main' }}
        id: deploy
        continue-on-error: true
        uses: bcomnes/deploy-to-neocities@v1
        with:
          api_token: ${{ secrets.NEOCITIES_API_KEY }}
          dist_dir: _site
          cleanup: true
Then add my GitHub Action. We gate this workflow step on whether it’s running on the main branch, and whether the previous step (id: deploy) had a “failure” outcome.
      - name: Deploy to Neocities fallback
        if: ${{ steps.deploy.outcome == 'failure' && github.ref == 'refs/heads/main' }}
        uses: jonchang/deploy-neocities@master
        with:
          key: ${{ secrets.NEOCITIES_API_KEY }}
          dir: _site
          clean: true
The full .github/workflows/ci.yml file should be as follows:
name: Build site

on: [push, pull_request]

jobs:
  build:
    runs-on: ubuntu-latest

    steps:
      - uses: actions/checkout@v2

      - run: make

      - if: ${{ success() && github.ref == 'refs/heads/main' }}
        id: deploy
        continue-on-error: true
        uses: bcomnes/deploy-to-neocities@v1
        with:
          api_token: ${{ secrets.NEOCITIES_API_KEY }}
          dist_dir: _site
          cleanup: true

      - name: Deploy to Neocities fallback
        if: ${{ steps.deploy.outcome == 'failure' && github.ref == 'refs/heads/main' }}
        uses: jonchang/deploy-neocities@master
        with:
          key: ${{ secrets.NEOCITIES_API_KEY }}
          dir: _site
          clean: true
This whole blog post was actually written to explain why this fallback exists, but it felt kind of weird to say “Neocities sometimes has these problems but you should still support it”, so I decided to write an entire tutorial instead. Go build a website with Neocities, it’s fun and you won’t regret it! They run their own CDN somehow! It’s a really impressive piece of work.
Note that if you’re not interested in doing all of this work, there are a number of solutions that are similar, such as Cloudflare Pages.